Sunday, December 22, 2013

Peppermint Brownies and a shout out!


I know I have been unpardonably delinquent in posting. I am hoping to make amends by bringing you brownies. Electronically. Although if you want to stop by my house you can have actual, non electronic brownies. Which sound much better. 

I am a big fan of the much celebrated crème de menthe brownies. However, they are so rich you can really only eat a tiny bit and let's face it, when I'm eating brownies, I want a lot. And let's face it, there's several steps. And sometimes I don't want all those steps for fancy brownies. So I came up with my own invention last night. They're rich but not so much that I can't eat one... and a half. And maybe some crumbs in the bottom of the pan. I offer up my invention to you for your snacking pleasure. I hope you enjoy!

Since we're going for easy here, make a pan of brownies per brownie mix instructions. You might think I'm crazy but Aldi brownie mix is the best by far of any I've tried. I'm sorry if you don't live near an Aldi. Your brownies just won't be as good. 😞 My mom actually buys some while she's visiting to hoard away at home. If you get a different brand, get the fudgy ones.  


Ok, back on track. Make your brownies. I made mine in a pan that's a half size of a 9x13. Or you could use a 9x9. If you make a 9x13, I would probably double the frosting recipe. When they're cool, mix 1/4 c. butter and 1 c. powdered sugar with the wire whip until creamed. Add 2 T. crème de menthe and 1/2 t. peppermint extract and a few drops of red food coloring if you desire. Spread on your cooled brownies and add a few pieces of crushed candy cane or starlight mints. Ta da! Easy and pretty!


Ok, I hope you stuck with me through all that because I want to give a shout out to my sister who recently sent me something I didn't even know I needed but once you see it, I'm sure you'll want one too!


Yes, that's right it's a bag from mood!!!! (This probably means nothing to you if you haven't seen Project Runway.) It's awesome and huge and I'm super excited to use it. I don't get to NYC much  but next time I go, mood is on my list!!! A big thank you to my sister! 

It's already a merry Christmas around here!

-t-

Saturday, December 14, 2013

Christmas craziness

Out of the four of us, I'm the only one with kids in school. If you have kids in school, you know this time of year is absolutely insane. Between shopping for gifts, keeping kids from tearing the decorations down (that's my two year old), and making sure everyone has socks/shoes/coats/hats/gloves when they leave the house.... Let's just say that my kids don't have socks about half the time.

Something has got to give. 

And don't even get me started on the "here's what our elf did last night that took me an hour to set up" or the "here are our gorgeously styled holiday pictures with no one screaming in them" or the "look at the amazing activities I planned for every day of the month in our Pinterest perfect countdown calendar" Facebook posts. It's amazing we all survive December. Our elf has yet to make an appearance this year, our Christmas card pictures (if they in fact make it to a card) will be from our vacay, snapped on a beach with an iPhone, and my countdown calendar is so disorganized - I think we are about four days behind, and I'm pretty sure one of those days the activity is "drink hot chocolate." Not exactly spreading goodwill towards men. 

And then there are the gifts for teachers. Ah, I wish I had a dollar for every conversation I have had with other moms about this. I could pay for post-holiday therapy. Or at least a massage. It's so hard to figure out - what do you get them?? Certainly not one more thing with an apple on it. What teachers do you give gifts to? Just the classroom teachers? The dance and private music lesson teachers? Each and every staff member at your elementary school?????? I can't make that decision for you - but I can show you something relatively easy and altogether lovely to make for gifts. 

If you have not yet discovered the joy that is making sugar scrubs, I highly recommend it. They are quick, easy, and are a nice change from some of the usual gifts. This is my very simple version of a sugar scrub. 

First, you need coconut oil (this is the ginormous size from Costco). 

Spoon some out into a bowl. I made a ton of scrub when I did this, and used the whole tub of oil. But I did it in two batches. 

Then dump sugar in. I used boring old granulated sugar - but it works fine. 

The measurements on this aren't exactly precise. When you mix it, you will get a feel for the consistency, and change it to what you like. If you prefer a crumbly, high-roughness scrub, add more sugar. If you prefer more of the moisturizing and softness of the oil, not as much sugar. 

You will also want to add oil for scent. I just use baking oils, they work perfectly fine. This will be candy cane scrub, so I used peppermint. And I may have poured the whole tiny bottle in. But you use your discretion. You like how I'm giving you so many choices???


Mix mix mix. 


I wanted mine to end up candy cane striped, so I split it in half and colored half of it. With food coloring for baking. It's all good. 


Then it's pretty easy!! Get a jar, start layering. 


I stuck my fingers down inside between every layer and evened it out. 


Keep layering until it's filled up!!


Pretty. Or it would be if my pics weren't so terrible. Sorry. 


Half of my tub of oil (which was about 27 ounces) made this many scrubs. And my containers were probably a little big. But they were cute. I will probably make a tag (and by make I mean scour Google images until I find a cute printable. But that's me.) They make a great gift, you can get several gifts taken care of with one batch, and your hands will be lovely and soft afterwards!! 

Merry Christmas! 

-k-


Wednesday, October 23, 2013

Fried Rice the Flavorful Way


If there is one recipe in my arsenal that I can almost always make with what I have on hand, it's fried rice. The runners up would probably be homemade pizza and quiche, but those are different posts. My husband loves it when he comes home to fried rice and I love it because it's super easy and quick. And healthy. It's an easy way to pack in a bunch of veggies and protein. Now this is not your standard fried rice. This is big on flavor, low on grease. Your mouth and tummy will thank me!!! Trust me, you'll be adding this workhorse to your repertoire. 

Here are the basics:
1 1/2 c. Uncooked rice, cooked (does that make sense??) white, brown, both, whatever your preference
Leftover chicken, beef, pork (my preference), and/or shrimp, chopped
3 slices bacon, crumbled
3 eggs scrambled and cooked separately
3 cloves garlic
Fresh or ground ginger
An assortment of veggies such as broccoli (super yummy), peppers, grated carrot, etc. 
1/2 onion, chopped
3 T. Soy sauce
Pepper
Oil for cooking


You can see I used sesame seeds, sesame oil, and peanuts. Whatever blows your skirt up. 


All right. Cook your rice and take the lid off so it dries out a bit or use leftover rice, chop your meats and veggies, cook your scrambled egg and heat a big pan to sauté all this stuff together. 

You'll see when I made this I added some of the "extras". A few things, like garlic, you have to have. But let's face it, why would you make this or really anything without garlic? Oh and don't question the bacon. Now, add a little oil to the bottom of your pan and sauté your garlic, onions and broccoli and whatever other veggies on medium-high heat. Sprinkle in 1t. ground ginger and let it brown a bit to bring out the flavor. (I used to make this with fresh ginger but I like the concentrated flavor of the ground better for this.) Lower your temp to medium and add your pre-cooked meats and bacon. Stir it around and add your rice. Sprinkle in pepper to taste and 3 T. soy sauce. Stir it up good. I mean well. And you're done!!!! Yay!!!! 


It does dirty up a couple pans, but it's still a one-pot wonder in my book. I normally serve this with pot stickers from the freezer section. I'm pretty sure there is absolutely nothing authentic about this meal, but it's sure yummy. If this meal was a girl, she'd be the easy-going one in the baseball jersey who's always fun to watch the game with. Flexible, goes well with everything, everyone likes it. Score. 

-t-

Friday, October 18, 2013

Crazy Easy Scarf Tutorial

Sorry this has been so slow in coming - busy week at our house!! Four kids will do that to you. As a side note - Tara and I went to see "Wicked" Sunday night - it was phenomenal!! I really loved it - the cast, costumes, set, music - it was an amazing experience. I need sparkly emerald green everything now. Lol. I also enjoyed my time with Tara - we got in lots of good girl talk, and it's amazing how one night like that can refresh you to face the week ahead!!!! 

Okay. Today is one of those terrible fall days that makes it crystal clear winter is not far away. Very chilly and rainy. I'm wearing my winter uniform - a cardigan over a tshirt, jeans, boots, and a scarf. I don't know what I did before the scarf rose in popularity. I live in them from October to March, maybe April. Last year, I looked for tutorials online for them, and could never find one I was totally happy with. So I took bits and pieces, figured out what I thought worked - and this is the result. A super easy infinity scarf. 

You will need one yard of fabric and matching thread. That's it!!! I prefer to do this with a knit, just for the softness and the way it lays, but you can do it with cotton or whatever strikes your fancy. I keep thinking a soft plaid flannel would be fun to try. 


This fabric is more like a sweatshirt material. I loved the stripe. But it may not have been the best thing to use for a tutorial, so I'll try to be clear as possible. 

Lay your fabric out, folded in half, like you bought it off the bolt. 


Cut the fabric on the fold, so you will end up with two pieces, each one yard long. 


Place these pieces together, right sides together. You are going to make a straight stitch all the way down to end up with one looooong rectangle with a seam in the middle. I used a half inch seam allowance on this project. 


Please become familiar with your back stitch on your machine, if you haven't already. I was shocked to find out some people don't use it. It will improve the quality of anything you sew. 


Once you have this done, I would press the seam out. 

Next we are going to fold the fabric in half lengthwise. The easiest way to do this is take both ends of the seam you just made, and, right sides together, line the seams up and pin. Pinning will help you keep all two yards where they need to be. 


Starting from that seam, line up the raw edges of the fabric and pin them together all the way down to each end. 


My mom - I mean Santa - put those adorable pins in my stocking last Christmas. I think she must have known about my future in blogging. Lol. 

Sew all the way down the pinned side. You will end up with a two yard long tube of fabric. 


This is my tube kind of folded up. Turn it right side out. 


Now, some tutorials will have you do some fancy and confusing twisting thing at this point. I don't see the need. Just take the ends of the tube, put the seams together (right sides together) and pin. 


I like to start stitching at the seam. I am a little type A - there is no scientific reason to start there. Just my own neurotic habit. Here's the only tricky part. You are going to stitch both ends of the tube together this way, but only as far as you can. We will have to finish by top stitching. 


See? Starting at the seam. I have to do it. 


It's tricky on this part to pin all around, so go slowly and line up the raw edges as you go, like I did in this picture above. 


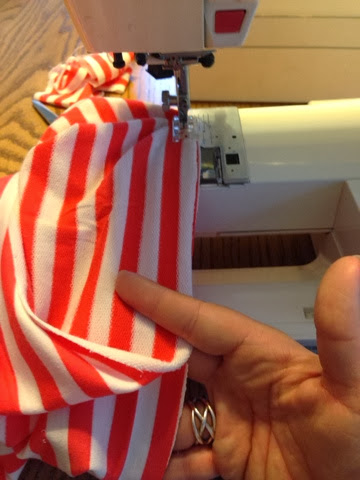
When it looks like this, and you can't go any farther, back stitch and get out of there. Unfold and straighten it all up, laying it flat so you have the unfinished section in front of you. 


If you look closely at this picture, you can see I have folded the raw edge down, so it is even with the rest of the seam. You are going to do that on both sides. 


And then pin. You will top stitch the part that isn't finished. 


I used a very small stitch allowance here, as small as I could while still making sure I got all the layers caught in the stitch. 


This is what my finished seam looks like. Not super gorgeous, but odds are no one will see it while you are wearing it. I usually stick the seams at the back of my neck to hide them. 


You are done!! Once you figure this out, it will only take you about 15 minutes to whip these babies out!! The second picture, I even triple-wrapped it. And you can play with the length of the fabric you start with. For little girls, use 1/3 yard, and you will skip the first step - just stitch the sides together in the tube as your first step. Your scarf collection will blossom in no time. 

Happy sewing!!!!
-k-

Saturday, October 12, 2013

Potatoes, Pumpkins and Pies

One of the only reasons I get up early on Saturday mornings is for scones, coffee, and......fresh produce!

Welcome to the farmers' market!


The first time I went to this market, I was not expecting a whole lot. However, now that I go almost every week, I really understand why it's so appealing. My misconceptions with these stands had to do with the lonely fruit stands I had purchased from off of the highway. Overpriced fruit that would go bad faster than I could eat it. Eight dollars for 3 peaches? No thank you.

Community farmers' markets, I have found, are much different. They have more vegetables than anything else, and you get the whole basket for the price; unless you are buying things like eggplant, pumpkins, or squash. The vendors are also all competing with each other, so the prices are pretty reasonable.


Now, what about the prices? Well, they may not be as cheap as the grocery store all of the time, it really depends on what you get, and where in the season they are. Tomatoes are nearing the end of their season, so they were getting pretty cheap. Pumpkins and squash are in season at the moment, so the prices are a little higher, but 75 cents for zucchini? Still not bad! Most prices are pretty reasonable. Some of the more popular, or rare items tend to be on the high side. One man was selling lamb meat..... at over 16 dollars a pound! But I guess someone is buying it, or he wouldn't be there every week selling it at the same price.

Part of the fun is going around, looking at all the different types, colors, shapes and sizes of the different vegetables. In the fall, it's so pretty! So.... what's the big deal about getting your produce here? Well, my answer is...... I just like to look at the person who grew my food, and the fact that they grew it within close driving distance. Some people don't mind veggies that came from a few states away, or even a different country. But why not go local and support some neighbors? It's fresher, and many of them have signs posted on their stands about what they used to grow it, which is pretty nice as well.

Shopping for your weekly meal plan is not the only thing to do as you visit. People sell home-made jams, spreads, and not to mention......delicious, fresh made baked goods.

Say hello to my pumpkin, white chocolate chip scone. Two dollars, and worth every little bite. There are also tarts, pies, breads, rolls, cinnamon rolls, and much more. And, they don't always have the same flavor of scones twice. Last time I had lemon raspberry, and they always have a savory flavor as well. This morning it was feta herb. Little early for savory flavors in my opinion, but oh, the smell was great. Yuuuummmmmy.

There are even a few things for the kids to do while you are glancing over the goods, and not to mention some good ole acoustic music. It really makes the morning a relaxing way to start the day, and a great way to start the weekend!

~h~


Thursday, October 10, 2013

Roasted Butternut Squash Soup

It is fall. Even though it may not FEEL like fall where I am, I still crave warm comfort foods. What is more comforting than soup? Here is my recipe for Roasted Butternut Squash Soup:

Ingredients:
I only had baby carrots in the fridge. Technically I stated "1 carrot" in the ingredient list, but this is close enough.


First peel and cube the squash. This is the hardest part,  I promise. In case you need help with how to tackle this step. There is a helpful tutorial here. I appreciate her attention to safe knife practices. 


Such a pretty orange color....

Now drizzle some EVOO and season with salt and pepper

Roast in the oven for about 25-30 minutes until tender
It should look like this when it's done:

YUM!
 Your kitchen should smell really good right now.
Melt the butter in your dutch oven, add the 1 Tbsp olive oil

Add your garlic and let it brown (only about 15-30 seconds) and stir! And now your kitchen smells even better!


Now add your raw veggies and let them cook for a few minutes


Add the broth, squash, and spices

(Hold off on more salt until the end, remember you salted the squash)


Let these simmer for about 20-30 minutes

Find and remove your bay leaf... then blend with immersion blender. Soup is VERY hot! Remember the popcorn hickey?  You have been warned.


Fall comfort food.


Now all you need is a grilled cheese sandwich and the next Flavia de Luce book. 

Enjoy!


Roasted Butternut Squash Soup

1 Butternut squash, peeled and cubed
1 shallot (a small onion is ok too... but I like flavor of shallots)
2 cloves garlic
1 medium carrot
1 celery stalk
4 cups chicken broth (1 box)
2 Tablespoons butter
1 Tablespoon extra virgin olive oil + more for roasting squash
1/2 teaspoon thyme
1/2 teaspoon nutmeg
1 bay leaf
cream (optional)
salt and pepper to taste

Preheat oven to 400F. Toss cubed squash with salt and pepper and a drizzle of olive oil. Spread on baking sheet in a single layer and roast in oven until tender, about 30 minutes, turning once with a spatula. You may have to do this in more than one pan depending on how large your squash is. Instead of doing multiple batches (that would take an hour!), put them on 2 different racks in your oven. When you turn the squash, just switch the pans so that it can evenly cook. While the squash is cooking, melt the butter and 1 Tbsp of olive oil in a dutch oven on medium heat. Toss in the garlic and allow to cook for about 15 seconds (until it gets golden brown). Toss in your raw veggies and allow them to cook for a few minutes to get tender. Then add the squash, broth, and spices. I would hold off on adding more salt at this point because the squash has been salted. Simmer on low for about 20-30 minutes. This is not an exact science. You just want your veggies to be tender and the flavors to blend together. When the veggies are tender, CAREFULLY fish out the bay leaf, then CAREFULLY blend with immersion blender until smooth. The soup is HOT! For some extra creaminess, you can add a splash of cream, but try it without first....it really doesn't need it. Feel free to add more salt now. Enjoy!

-E-