Showing posts with label Recipes. Show all posts

Sunday, December 22, 2013

Peppermint Brownies and a shout out!


I know I have been unpardonably delinquent in posting. I am hoping to make amends by bringing you brownies. Electronically. Although if you want to stop by my house you can have actual, non electronic brownies. Which sound much better. 

I am a big fan of the much celebrated crème de menthe brownies. However, they are so rich you can really only eat a tiny bit and let's face it, when I'm eating brownies, I want a lot. And let's face it, there's several steps. And sometimes I don't want all those steps for fancy brownies. So I came up with my own invention last night. They're rich but not so much that I can't eat one... and a half. And maybe some crumbs in the bottom of the pan. I offer up my invention to you for your snacking pleasure. I hope you enjoy!

Since we're going for easy here, make a pan of brownies per brownie mix instructions. You might think I'm crazy but Aldi brownie mix is the best by far of any I've tried. I'm sorry if you don't live near an Aldi. Your brownies just won't be as good. 😞 My mom actually buys some while she's visiting to hoard away at home. If you get a different brand, get the fudgy ones.  


Ok, back on track. Make your brownies. I made mine in a pan that's a half size of a 9x13. Or you could use a 9x9. If you make a 9x13, I would probably double the frosting recipe. When they're cool, mix 1/4 c. butter and 1 c. powdered sugar with the wire whip until creamed. Add 2 T. crème de menthe and 1/2 t. peppermint extract and a few drops of red food coloring if you desire. Spread on your cooled brownies and add a few pieces of crushed candy cane or starlight mints. Ta da! Easy and pretty!


Ok, I hope you stuck with me through all that because I want to give a shout out to my sister who recently sent me something I didn't even know I needed but once you see it, I'm sure you'll want one too!


Yes, that's right it's a bag from mood!!!! (This probably means nothing to you if you haven't seen Project Runway.) It's awesome and huge and I'm super excited to use it. I don't get to NYC much  but next time I go, mood is on my list!!! A big thank you to my sister! 

It's already a merry Christmas around here!

-t-

Thursday, October 10, 2013

Roasted Butternut Squash Soup

It is fall. Even though it may not FEEL like fall where I am, I still crave warm comfort foods. What is more comforting than soup? Here is my recipe for Roasted Butternut Squash Soup:

Ingredients:
I only had baby carrots in the fridge. Technically I stated "1 carrot" in the ingredient list, but this is close enough.


First peel and cube the squash. This is the hardest part,  I promise. In case you need help with how to tackle this step. There is a helpful tutorial here. I appreciate her attention to safe knife practices. 


Such a pretty orange color....

Now drizzle some EVOO and season with salt and pepper

Roast in the oven for about 25-30 minutes until tender
It should look like this when it's done:

YUM!
 Your kitchen should smell really good right now.
Melt the butter in your dutch oven, add the 1 Tbsp olive oil

Add your garlic and let it brown (only about 15-30 seconds) and stir! And now your kitchen smells even better!


Now add your raw veggies and let them cook for a few minutes


Add the broth, squash, and spices

(Hold off on more salt until the end, remember you salted the squash)


Let these simmer for about 20-30 minutes

Find and remove your bay leaf... then blend with immersion blender. Soup is VERY hot! Remember the popcorn hickey?  You have been warned.


Fall comfort food.


Now all you need is a grilled cheese sandwich and the next Flavia de Luce book. 

Enjoy!


Roasted Butternut Squash Soup

1 Butternut squash, peeled and cubed
1 shallot (a small onion is ok too... but I like flavor of shallots)
2 cloves garlic
1 medium carrot
1 celery stalk
4 cups chicken broth (1 box)
2 Tablespoons butter
1 Tablespoon extra virgin olive oil + more for roasting squash
1/2 teaspoon thyme
1/2 teaspoon nutmeg
1 bay leaf
cream (optional)
salt and pepper to taste

Preheat oven to 400F. Toss cubed squash with salt and pepper and a drizzle of olive oil. Spread on baking sheet in a single layer and roast in oven until tender, about 30 minutes, turning once with a spatula. You may have to do this in more than one pan depending on how large your squash is. Instead of doing multiple batches (that would take an hour!), put them on 2 different racks in your oven. When you turn the squash, just switch the pans so that it can evenly cook. While the squash is cooking, melt the butter and 1 Tbsp of olive oil in a dutch oven on medium heat. Toss in the garlic and allow to cook for about 15 seconds (until it gets golden brown). Toss in your raw veggies and allow them to cook for a few minutes to get tender. Then add the squash, broth, and spices. I would hold off on adding more salt at this point because the squash has been salted. Simmer on low for about 20-30 minutes. This is not an exact science. You just want your veggies to be tender and the flavors to blend together. When the veggies are tender, CAREFULLY fish out the bay leaf, then CAREFULLY blend with immersion blender until smooth. The soup is HOT! For some extra creaminess, you can add a splash of cream, but try it without first....it really doesn't need it. Feel free to add more salt now. Enjoy!

-E-


Saturday, October 5, 2013

Kettle Corn Without the Kettle!

Fall is here! Summer left somewhere after midnight last night and we woke up to fall this morning. I don't know about where you are, but it has come pretty late for us. Not that I'm complaining. Originally a Florida girl myself, I love having a real fall but that just means that winter's coming. And nobody needs winter. Maybe a week's worth to get your hot chocolate in and stuff like that.  

So, in continuation of our fall series and to celebrate this morning's arrival, I am posting a new family favorite in this house. I have been making kettle corn pretty much every evening for the last few weeks. Dentists and gastroenterologists are cringing everywhere. But it's soooo good! And easy! No popcorn popper required. I'm not really sure how healthy it is but compared to what we normally snack on in the evenings, we have to be losing weight. Right? (Maybe that last part is wishful thinking.)

So, time to get out a pot with a lid, popcorn kernels, salt, sugar and oil. I always use sea salt. I don't know why. It just seems like a good idea. I have been trying and re-trying different techniques and I think I have it about perfect now. 


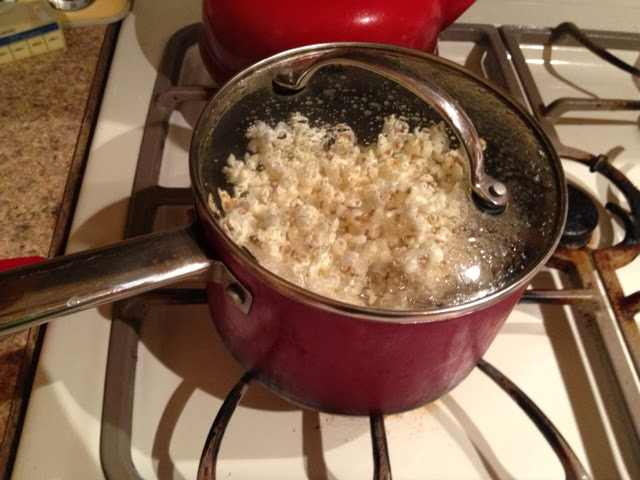
Put a couple tablespoons of canola oil (really any kind of oil) in the bottom of your pot and one popcorn kernel. Heat it on medium-high a few minutes until the kernel pops then throw in 1/3 cup of kernels, 3 teaspoons of sugar (teaspoon as in the kind you use for cereal, in the drawer with the knives and forks- this is all very scientific), several pinches of salt, and stir it up with a spatula then shake it all flat in the pot. That was a really long sentence. 


Then, wait until it starts popping and then give it some shakes. The more it pops, the more you need to shake it to keep the sugar from burning. About halfway through or close to the end I really keep it higher off the heat or turn it off altogether. It's better to have some unpopped than a whole batch of burnt sugar popcorn. Just leave the lid on until it stops popping then pour it in a bowl. It will stick together a bit but just break it up when the sugar cools. Now I will warn you. You will be tempted to eat this straight from the pot, but DO NOT do it! That sugar is HOT. Wait for it to cool. You may still get hit with an errant kernel popping and end up with a popcorn hickey on your neck. I don't know anything about that. I'm just saying it could happen. 


Now you have a lovely bowl of delicious kettle corn you will be forced to share. My suggestion is to make this when no one is around so it's all yours. You will wonder how a whole bowl could just disappear.


It's even easier to make just butter and salted popcorn, so feel free to try different variations. It turns out well when you're not contending with cooking sugar. I know people have suggested throwing Parmesan cheese in there. I have yet to figure out why because so far I have only ended up with flecks of burnt cheese. And really it's not cheesy anyway. I want to know my cheese is there. I have a variation involving ranch dry mix I would like to get to, but I've been having a hard time getting past the kettle corn. 

Enjoy!
-t-

Saturday, September 28, 2013

Confessions of a Snobby Smoothie Girl

Confessions of a Snobby Smoothie Girl

One might ask how you can be snobby about ..........a smoothie? 

Here are my two cents:

Breakfast food is SERIOUS stuff. Although it may be hard to mess up most of the time, it is the butter on the biscuit of comfort food. Breakfast is also one of the most important meals of the day, to jump start your metabolism by boosting your blood sugar and curbing your appetite. 

So, this is not a post about comfort food, per se, because if we all had biscuits and gravy and bacon for breakfast every morning, we may not be around long enough to enjoy the rest of the recipe posts to come. So, in defense of breakfast, I am promoting smoothies as the healthy comfort food. But.....with extreme caution. 
Because...... only about 1/3 of smoothies I have made/ordered/been given/tasted are actually good. 

There are several things that can go wrong with this liquid meal. Either the fruit is too tart, the top is too frothy, the ice is not well blended and dispersed, it isn't sweet enough, or it is made with ice cream or sorbet.... ice cream for breakfast? 
Really.... if I am going for ice cream to start my day, I will just break out the mint chip.

But I am sure you get the point, a good smoothie recipe is hard to come by. Some of you may not be as picky as I am, but in this family we are snobby about ALL the food. You couldn't be caught dead using margarine in place of butter, or show up on a holiday with a store-bought pie (with the exception of a Perkins pie), and you might as well not bother, because barely anyone would eat it with 8 other ones that are homemade. 

So, after much experimentation on the levels of texture, flavor, sweetness and health and many smoothies ending up down the drain.... Here is my snobby smoothie recipe:


Here are my personally preferred ingredients:

- Almond milk
-Vanilla yogurt
-Frozen bananas
-Frozen blueberries
-Frozen blackberries
-Vanilla protein powder (optional) 


Start out with your bananas. Bananas are great for you, and they really bring the sweetness and smooth texture to your smoothie. Have some bananas that are going a little too ripe for eating? Peel them, chunk them, and freeze them in a ziplock. Waste not, want not. For those of us who don't like bananas, or have the misfortune of being allergic, just add some extra of your frozen berries, it may need a little more almond milk, too. 

Equivalent to about a half to 3/4 of a banana is what I use for one serving. 


Then, it's time to add your other favorite fruits. Choosing fruit to add to your smoothie can sometimes be a little tricky. The taste of your smoothie can depend on this important ingredient. I have started to stray away from strawberries unless they are pretty sweet before I freeze them, because they can give it a really tart aftertaste. So, I tend to stick with blueberries and blackberries, however, if you don't have a super powerful blender, you may have to deal with the seeds. And for those of you who are fruit purists, and like to have all fresh fruit.... I will warn you, the texture will be sacrificed. Frozen fruit is so much better than fresh when it comes to smoothies since it allows you to get the frozen beverage without adding any ice. If you do add it, it tends to foam and the ice all raises to the top. 

So, figure out your fruit, and add about a hand full of whatever you decide on. 


Next, you add your protein. Not everyone is a fan of yogurt, and not everyone is a fan of protein powder, but they do make your smoothie pretty nutritious and keep you from getting hungry before lunch. Most of the time, I add both, in which case, I would use a half container of the yogurt, and a half scoop of the powder. However, if you only have one or the other, you can use a full container of yogurt or a full scoop of powder to get about the same amount of protein. 


In this picture below,  you can see what frozen yogurt in the container looks like. It may look a little funny, but I assure you, it adds to the good texture. You can keep tons of them in your freezer. If you are only using half of one, you can zap it for about 15 seconds, then squeeze the sides of the container to break loose what you want and then refreeze. Also, if you get the ones with the foil lids...... keep it, and just fold it back over the lid! 


Now, it's time for the liquid to bring it all together. First of all, I am in no way a vegan/vegetarian. I love my meat. Especially bacon. Mmmmm.... bacon. ( I am sure there will be an upcoming post about bacon, I am starting to wonder with the bacon obsession, how that didn't manage to get into the title of the blog somehow.....) 
But anyway.... the reason I have almond milk, is because it is healthier than cow's milk in a couple of ways, with less fat and less calories. But the most important part, is that it adds natural sweetness to the smoothie that cow's milk doesn't. You don't have to like the way almond milk tastes by itself to like it in a smoothie. You probably wouldn't even be able to tell it was almond milk once it is all blended together. It's pretty good stuff though, just not as much calcium. 

I usually just use enough to almost submerge the other ingredients in the cup (about 3/4 to a cup) but you can add as you like for desired thickness.


Last of all.....the blender. I have had the great fortune of getting every known kitchen appliance on earth (aside from a bread maker) this year for my birthday, and graduation. I love my kitchen aid, and Keurig, I use them TONS. However, my Ninja is the one thing I use consistently on a daily basis. Simply because it is .....awesome. It is very loud, but it is also run by horsepower. The only reason I bring this up is because it blends everything super well, not only for smoothies, but other things as well. I even grind coffee with it, and it's super easy and fast to clean. But the main thing that is important for me, is that it blends the seeds as well as the rest of the ingredients, and the texture is great. So blend away! 


And again, your finished product. The snobbishly perfect smoothie. :) 

And in case you are wondering..... if you measure out all the ingredients and do the calculating like I do, it's always under 300 calories!

Enjoy!! 

~ H


Thursday, September 19, 2013

Hot Fudge Sauce!


I'm afraid I'm going to ruin things for you. Once you try this recipe, you're never going to be able to buy chocolate sauce at the store again. I would apologize but I'm pretty sure you'll thank me for it. I have been looking for things to dunk in mine since I made this yesterday. It's still sitting in the middle of my counter. I need to put it in the fridge so I only see it every time I open the door. Instead of every time I walk into the kitchen. It's a problem. 


You'll notice a considerable amount is gone. Yeah, that was one bowl of ice cream last night. Like I said, I'm afraid I'm going to ruin things for you. 

The cast of characters:

BERNICE’S HOT FUDGE SAUCE
1/4 c. butter
1/4 c. water
12 oz. pkg. semi sweet chocolate chips
14 oz. can sweetened condensed milk
1 t. vanilla
Combine butter, water & chocolate chips in top of double boiler.  Stir till chips melt.  Add milk & vanilla.  Blend well.  Remove from heat.  Cool. Store, covered, in fridge up to 6 months. (Not that it will still be around by then!) It makes one pint sized jar. 

I will accept additional jars of chocolate sauce as thanks for bringing this little spot of warm chocolatey goodness into your life. :) Enjoy and happy weekend!

-t-